Glossary · Zones
Mitigation block
A mitigation block is a zone price returns to so that traders caught on the wrong side can exit nearer to break-even. On a chart it is a failed order block: the swing that should have made a new high or low falls short, structure breaks the other way, and the old zone is retested from the other side.
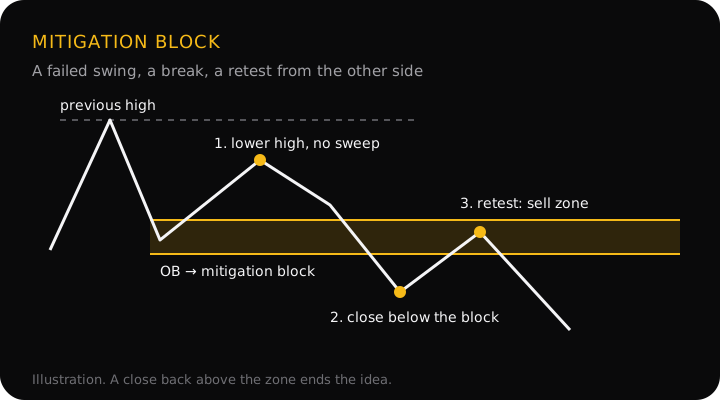
How a mitigation block forms
It starts as an ordinary order block. Take a bullish one in an uptrend, the last down candle before a rally:
- Price rallies from the block but stops short of the previous high. That is a lower high: buyers tried to continue the trend and couldn't.
- Price falls and closes below the order block and the last higher low. Structure has broken against the trend (a change of character). Everyone who bought the block is now losing.
- Price rallies back up into the old block from below. Many of those buyers sell there to get out near what they paid. The old buy zone is now a bearish mitigation block, a place to look for a sell.
A bullish mitigation block is the mirror image: in a downtrend, a bearish block whose drop fails to make a new low, then price closes above it, then comes back down to it and holds. "Mitigation" refers to those trapped traders reducing their loss, which is the explanation the StraviFX glossary uses. It is a story about behaviour, not something you can see in the data, so judge the zone by what price does there.
Mitigation block or breaker block
The two zones look alike, and many tools and courses use the names interchangeably. The stricter reading separates them by what happens before the failure:
| Before the block fails | Then | Name |
|---|---|---|
| Price makes a new high or low and sweeps the stops | Closes through the block | Breaker block |
| Price falls short of the previous high or low | Closes through the block | Mitigation block |
Two more meanings cause confusion. A "mitigated" order block usually means one that price has simply traded back into; it has not failed. And some writers use "mitigation" for any zone where large traders are said to settle earlier orders. This page uses the failed-swing version above, with the StraviFX glossary's explanation of why it can work. Whichever you use, note it in your journal, because the rules pick out different zones.
A worked example
A 4-hour EUR/USD chart. The prices are an illustration, not real data.
- The order block: in an uptrend, the last down candle before a rally trades between 1.0870 and 1.0885. The previous high is 1.0950.
- The failed swing: the rally stalls at 1.0930, 20 pips short of 1.0950. That is a lower high, and no stops above 1.0950 were taken.
- The break: price falls and closes at 1.0855, below the block's low of 1.0870, which was also the last higher low. The bullish block has failed, and 1.0870–1.0885 is now a bearish mitigation block.
- The trade idea: price rallies back into the zone. A sell at 1.0880, with the stop at 1.0893 (8 pips above the top of the zone), risks 13 pips. The target is the next swing low at 1.0841, 39 pips away: a 1:3 risk-to-reward.
- The size: on a $1,000 account risking 1% ($10), 13 pips at $10 a pip per standard lot is $130 per lot, so 0.07 lots (rounded down), risking $9.10.
A stop above the failed high instead, at 1.0938, would be 58 pips: the same 39-pip target gives 1:0.67, and the size drops to 0.01 lots (risking $5.80). The tighter stop gives the better ratio but is hit more easily; a close back above 1.0885 ends the idea either way. The lot size calculator works out the size for any stop.
Why it matters
A mitigation block marks the moment a trend runs out of push. The failed swing shows buyers (or sellers) couldn't reach the last extreme, and the close through the block shows the zone they relied on no longer holds. That gives you two things: a reason to stop trading the old direction, and a defined level where a trade in the new direction is wrong.
Common mistakes
- Mixing it up with a mitigated block. A block that price has traded into is not a failed block. Only a close through it makes the flip.
- Acting on the lower high alone. Without the close below the last higher low, the uptrend is still intact and the old block can still hold.
- Calling the break on a wick. A wick through the block that closes back inside is a test or a sweep, not a failure.
- Ignoring the bigger picture. A 15-minute mitigation block against a strong daily uptrend is a pullback until the higher timeframe says otherwise.
- Putting the stop inside the zone. Price often trades deep into the block before turning. The stop goes beyond its far side.
Questions
What is the difference between a mitigation block and a breaker block?
Both are order blocks that failed and flipped. In the stricter ICT reading, a breaker forms after price first made a new high or low beyond the previous one, taking the stops there, before it turned. A mitigation block forms when that swing falls short: price fails to make the new extreme, then breaks structure the other way.
Is a mitigation block the same as a mitigated order block?
No, though the names are confusingly close. A mitigated order block is a block that price has come back and traded into, and it can still be valid. A mitigation block is a block that failed: price closed through it, and the zone is now watched from the other side.
Does a lower high on its own make a mitigation block?
No. A lower high is only a warning. The block becomes a mitigation block when price also closes below the last higher low, breaking structure. Until that close, the old bullish block may still hold.
Where does the stop go on a mitigation block trade?
Beyond the far side of the zone, with a few pips of room, or beyond the failed swing if you want more room. If price closes back through the zone, the trapped traders were not the ones in control, and the idea is gone. Size the position for that distance.
Mitigation blocks in the app
The StraviFX glossary defines mitigation blocks so you can follow any reading that mentions one, and every term in an analysis links to its definition. The app doesn't hunt for mitigation blocks on its own. On Premium's extended analysis, the stop goes just beyond the swing point or order block whose break would prove the idea wrong, plus a buffer of about half the average candle range (ATR). The decision stays with you.
Get StraviFX
Point your camera at any chart and StraviFX reads the structure, plans the entry, stop and targets, and sizes your risk. Free to download on Android, with optional subscriptions.