Glossary · Zones
Breaker block
A breaker block is a failed order block: price closes through it, then comes back to it from the other side, where it can act in the opposite direction. A broken bullish block becomes a place to sell; a broken bearish block becomes a place to buy.
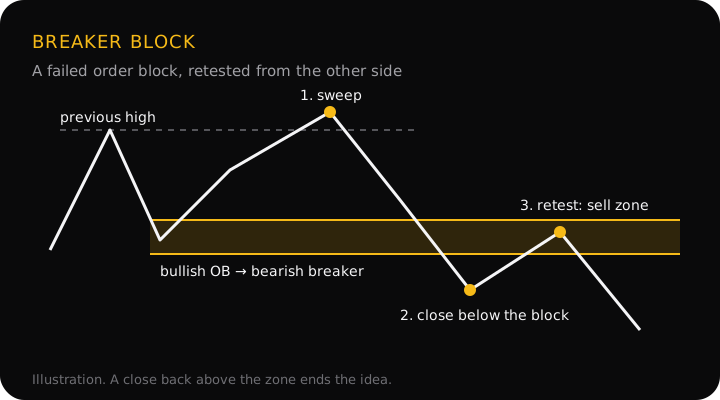
How a breaker forms
A breaker starts life as an ordinary order block. Take a bullish one, the last down candle before a rally:
- Price rallies from the block and makes a new high, beyond the previous high, taking the buy stops there (a liquidity sweep).
- The rally fails. Price falls and closes below the bottom of the order block. The buyers who used it are now losing.
- Price rallies back up to the old block from below. That block is now a bearish breaker: a place to look for a sell.
A bullish breaker is the mirror image: a bearish block that fails after a new low, then holds as a floor when price comes back down to it. The usual explanation is that traders caught on the wrong side close their positions at break-even when price returns, which adds orders in the new direction.
Breaker or mitigation block
Traders don't agree on whether step 1 is required. In the stricter ICT reading, it is: without the new high or low before the failure, the flip is a mitigation block, not a breaker. Many charting tools and courses skip that test and call any broken order block a breaker.
StraviFX's glossary keeps the plain definition: a failed order block that price returns to from the other side. If you trade breakers, decide whether you want the sweep first, and note it in your journal, because the two rules give you different trades.
A worked example
A 1-hour GBP/USD chart. The prices are an illustration, not real data.
- The order block: the last down candle before a rally trades between 1.2710 and 1.2725. The rally makes a high at 1.2790, 10 pips above the previous high at 1.2780, and sweeps the buy stops there.
- The failure: price then falls and closes at 1.2695, below the block's low of 1.2710. The bullish block has failed, and 1.2710–1.2725 is now a bearish breaker.
- The trade idea: price rallies back into the zone. A sell at 1.2718, with the stop at 1.2733 (8 pips above the top of the zone), risks 15 pips. The target is the next swing low at 1.2670, 48 pips away: a 1:3.2 risk-to-reward.
- The size: on a $1,500 account risking 1% ($15), 15 pips at $10 a pip per standard lot gives 0.10 lots, risking $15.
A tight zone gives a tight stop and a good ratio on paper, but breakers fail too. A close back above 1.2725 ends the idea. The lot size calculator works out the size for any stop.
Why it matters
A breaker tells you something a plain order block can't: that one side tried and lost. Instead of buying a zone that has already failed, you get a reason to look the other way, with a clear level where that new idea is wrong. It is also a reminder that a zone is only a zone until price closes through it.
Common mistakes
- Calling it on a wick. A wick below an order block that closes back inside is a test, or a sweep, not a failure. The block breaks on a close beyond it.
- Fading the new trend. A breaker usually forms after a change of character. Buying the old bullish block again at that point is trading the trend that just ended.
- Ignoring which rule you use. With and without the sweep, the zones differ. Mixing the two makes your results impossible to compare.
- Putting the stop inside the zone. Price often trades deep into a breaker before turning. The stop goes beyond its far side.
Questions
What is the difference between a breaker block and a mitigation block?
Both are order blocks that failed and flipped. In the stricter ICT reading, a breaker forms only after price first took liquidity, making a new high or low beyond the previous one, before turning and breaking the block. If the swing fell short of the previous extreme, the same flip is called a mitigation block.
Is any broken order block a breaker?
In loose use, yes, and many indicators mark it that way. Under the stricter rule it needs the liquidity sweep first. Neither is wrong, but they mark different zones, so check which rule a chart or a course is using before you compare results.
Is a breaker block the same as support turning into resistance?
It is the same idea applied to a zone instead of a line. A broken support level that holds as resistance on a retest is a role reversal. A breaker is that reversal at a specific candle: the order block that should have held and didn't.
Where does the stop go on a breaker trade?
Beyond the far side of the breaker zone, with a few pips of room. If price closes back through the zone, the flip has failed as well, and the idea is gone. Then size the position for that distance.
Breakers in the app
The StraviFX glossary defines breaker blocks so you can follow any reading that mentions one, and every term in an analysis links to its definition. The app's rules don't hunt for breakers on their own: the hourly Swing signals check works from sweeps, breaks of structure and fair value gaps, and the analysis places stops beyond the swing point or order block that would prove the idea wrong. The decision stays with you.
Get StraviFX
Point your camera at any chart and StraviFX reads the structure, plans the entry, stop and targets, and sizes your risk. Free to download on Android, with optional subscriptions.